AZ-3 Mount Mod
Getting the balance right - Modifying a Synta AZ-3 mount to have perfect balance.
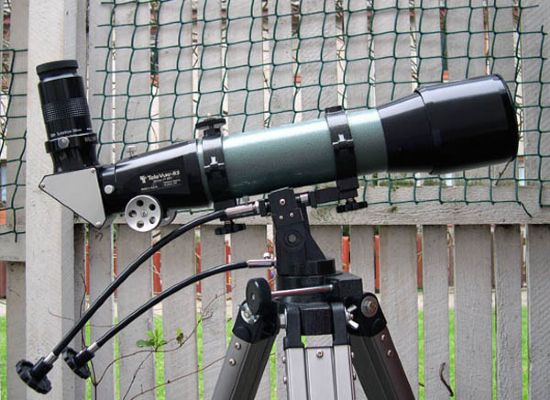 Some of you may know of my fondness for small refractors. I find them to be very useful telescopes with quick cool-down times, excellent image sharpness and contrast and low to moderate weight. For these reasons I usually take a small refractor with me when I go on holiday, and indeed when I took my Stellarvue Nighthawk with me to Wales in 2004 I had several wonderful nights of exquisite viewing. Now although a good small refractor would seem to be ideal for holidays and quick set ups, the question of what to mount it on requires some thought. Many people use photographic tripods, but unless you get a very heavy duty (and expensive) one the ‘scope can overload the mount and you may have a less than steady viewing experience. There are many lightweight equatorial mounts available such as the EQ2 and EQ3 from Synta, or the Orion UK GEM mount, but these are bulky to carry around and detract from the ‘grab and go’ holiday ‘scope ethos. A good mainstream Alt-Azimuth (Alt-Az hereafter) mount for small to mid-sized telescopes is Synta’s AZ-3 mount. It is quite often supplied with a 3” or 4” refractor atop it, is lightweight, of simple design, and unusually for an Alt-Az mount it has slow-motion cables attached. These enable you to track an object simply by turning the knobs at the end of the flexible cables rather than actually pushing the telescope itself. This gives a smoother view with less vibration.
I decided to get one of these over a year ago, but found that most of the UK suppliers had sold out! Seems everyone else had the same idea I had! I eventually tracked one down at Pulsar Optical. It was the last one they had in stock and was priced at £89, less than the other prices I had seen quoted. I placed the order and the mount arrived a couple of days later in sturdy packaging. It was a piece of cake to assemble, but I did immediately notice that once assembled the movements on both axes were somewhat stiff and, yes, squeaky! Of course that’s par for the course with Synta mounts- they don’t use grease as a lubricant but instead some sort of industrial mixture of glue and molasses! It took about an hour to disassemble the head of the mount, scrape off the old gloop, and replace with 25year vintage Castrol Lithium grease. Result: smooth quiet motions.
I got many chances to try out the mount with an 80mm f5 refractor for a while, and then with my Stellarvue Nighthawk. Both ‘scopes gave great wide field images and were fairly short and ‘stubby’, making them ideal for carrying around and quick looks. The views were excellent, but the stability of the mount was variable. When viewing near the horizon or up to an elevation of about 45 degrees the whole thing was very stable and easy to move. When using the AZ-3 mount you move the telescope by turning the slow-motion cables. One cable moves the mount head (and thus the optical tube) left and right, and the other moves it up and down. I noticed very quickly that when trying to view 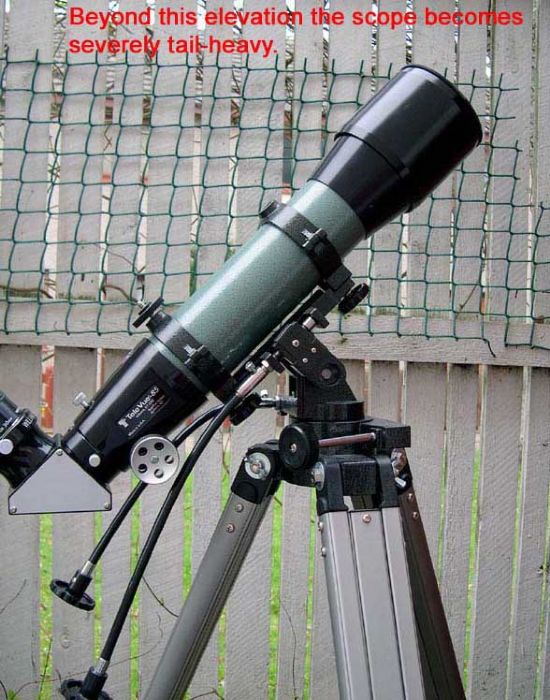 objects above 45 degrees, the centre of gravity of the telescope would be positioned towards the rear of the tube assembly, quite far behind the actual pivot point on the mount. This meant that the telescope was unbalanced and the altitude slow motion cable was not able to exert enough force (torque?) to move the telescope down (forward) when I wanted to. I could force it to do so by tightening the single nut about which the altitude bearing rotated, but that meant there was too much tension when viewing at lower elevations and the motion was then sticky and stiff. I realized that if it was a problem with the Stellarvue Nighthawk, it would be a lot worse with the Televue 85 refractor, which is a fair bit heavier than the Nighthawk despite being about the same size. This was a tricky problem, but I found a way of fixing it.
I determined that if there was too much weight at the back end of the telescope I needed to counterbalance that with some form of weight at 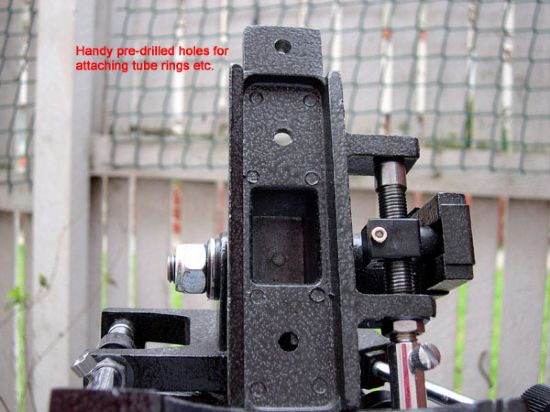 the front end. My idea of applying a single ankle-weight around the front end of the tube yielded only partial success- the weight was too close in to the tube assembly, and as the angle of elevation varied so did the position of the centre of gravity! I had to have a moveable counterweight system as used on the equatorial mounts. This was not too great a problem. I had read on the internet about several people who had made a similar modification with varying degrees of success, and the AZ-3 has some very handy non-threaded holes drilled through the head of the mount that are ideal for the budding mount-modder to stick things into.
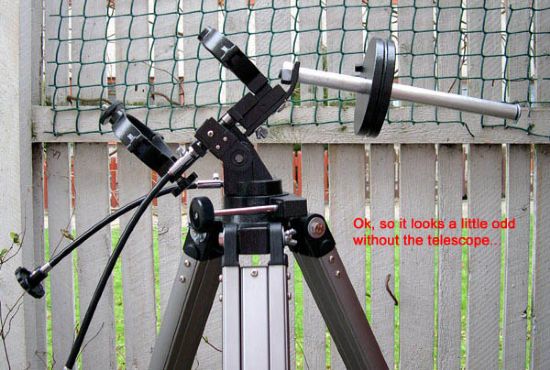
I already had a spare 4lb counterweight from a previous telescope, but I needed a counterweight bar to mount it on and some way of attaching the bar to the mount itself. I realized that the bar would have to be mounted at an angle of about 60 degrees from the horizontal (or 30 degrees from the vertical) to allow for free movement of the weight when the tripod’s legs were splayed. This meant having an angled bracket manufactured to take the counterweight bar. To get these sourced or made I contacted Barrie Watts at Beacon Hill Telescopes. Beacon Hill used to manufacture telescopes before the huge invasion of mass-produced telescopes in the late nineties and early noughties, and so had all the materials and machinery necessary to make these bits for me. He supplied a 12” length of 20mm diameter aluminium rod with a thread at one end to allow a nut of suitable size to attach it to the aluminium bracket that he also provided. The bracket was angled perfectly to allow free movement of the mount head without the counterweight crashing into the tripod legs. These parts took a couple of weeks to appear, and he only charged me £20 including postage! Incidentally, Barrie Watts has a great deal of knowledge about many types of telescope and accessory and is always very happy to share that knowledge. I needed a small spacer to go between the bracket and the underside of the mount head to give enough room for the threaded part of the bar to have its nut attached, and this was made simply from an offcut of wood found in the shed. Then I just needed some bits and pieces to hold it all together, which meant finding a couple of oversized washers, a couple of m6 bolts and a wing-nut.
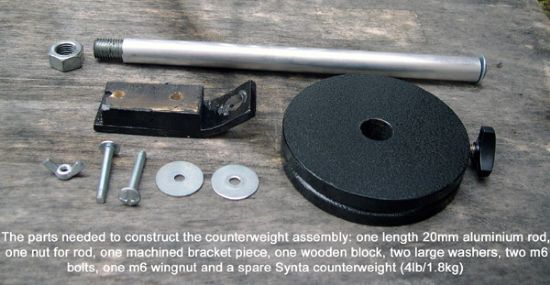
Attaching the assembly to the mount was just a matter of bolting the spacer block and bracket to the underside of the mount with the m6 bolts, using the washers to spread the tension from the bolts over the surface of the bracket underside. I found that this seemed to hold it more securely. The wing nut was used to tighten the rearmost bolt, and the other one was placed through the front hole and held in place by the threaded tube ring on top of the mount. I then slipped the counterweight onto the bar, placed the bar through the hole in the front of the bracket and locked it in place with a suitably sized nut. The pictures to the side of these pages are clickable, and will open up larger pictures that show these details maybe a little more clearly than my written explanation. Apart from a quick lick of crinkle-finish black Hammerite paint to match the mount hardware that was it done. It did look a little weird without a telescope attached, but I suspected it would be pretty effective.
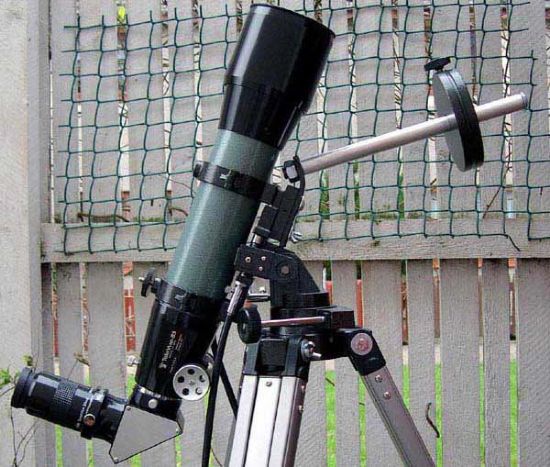
The result of this small amount of work is that on the occasions I’ve had the Televue 85 out on the AZ-3 since modifying the mount, I’ve been able to view objects at all angles, not just low down, and still have complete control over the altitude using the slow motion cable. Everything is smooth and there is no longer any ‘settling’ or dropping of the tube when viewing at high elevations. In fact, I can view now virtually at the zenith with no problems at all. As the altitude angle increases I simply loosen the counterweight and slide it further out along the bar and lock it in place (see picture) and that gives me complete control over how much counterweight force, or ‘moment’ is applied about the altitude pivot. Simple and effective, the way all things should be!
For carrying the mount and counterweight in the car, I can just unthread the bar and it then takes up very little space. This has converted my Televue 85 refractor from being an equatorial-only telescope into also being my grab’n’go scope, despite the fact that it weighs a good 10lb when equipped with a 2” diagonal and hefty 2” eyepiece. The total cost was about £23, allowing for the fact I already had a spare counterweight, and I feel that the work has made an already good mount into an excellent one.
Antony McEwan