The Bit in the Middle
A look at the bits between focuser and eyepiece (part 1)
By Antony McEwan
This astronomy business is a complicated thing. First you buy a telescope, making sure that it’s a good one and appropriate for your needs. Then you have to buy some decent eyepieces to upgrade the ones you got with your new telescope, because these will ‘perform better and show more stuff’. Now you’d think that was the end of it, wouldn’t you? You simply plug the eyepiece into the focuser tube, and Hey Presto, you’re in seventh heaven. But not necessarily so, because between the focuser drawtube and your eyepiece there is usually another little thing. Sometimes more than one little thing. If you have a reflector you will attach the eyepiece to the focuser using a visual back. If you have a refractor or catadioptric telescope you will probably use a diagonal and a visual back. So what are these things, why are they important, and what do we need to know?
The Optical Train
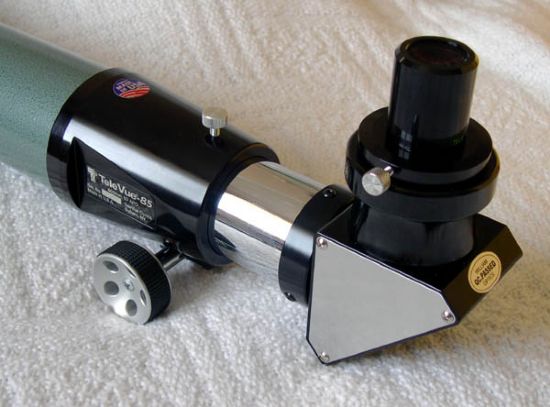
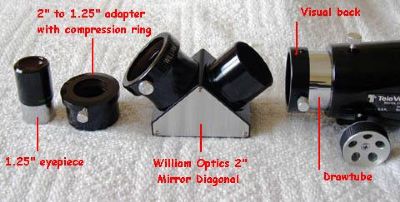
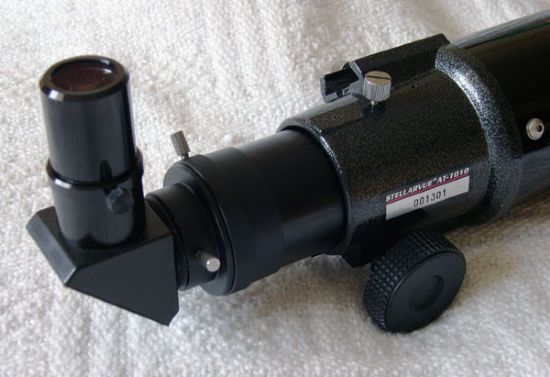
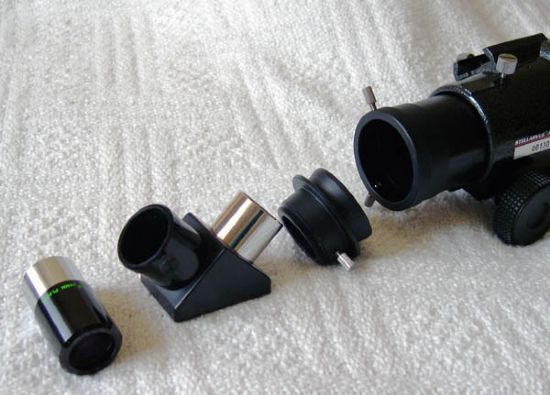
 As I do not own any catadioptric telescopes at the moment, my examples will be from the world of refractors, but the same principles will apply to Schmidt Cassegrains and Maksutovs. As you will see by looking at the image below, there are many elements in the optical train of an average refractor set-up. The light from the object being observed passes through the objective lens at the front of the refractor, and passes through the eyepiece and into the eye. To make sure the eyepiece and diagonal are aligned correctly, there is an adapter ring screwed onto the end of the focuser drawtube. This ring, or ‘visual back’, is what holds the diagonal securely and squarely in the light path. It should itself be screwed fairly tightly onto the back of the drawtube so there is no slop in it, and it should not move freely at all, unless you want your diagonal and eyepiece combination to suddenly revolve and crash to the ground! The visual back may have a 2” diameter or a 1.25” diameter. If it has a 2” diameter, it will hold the ever more popular 2” diagonals and eyepieces. If it has a diameter of 1.25” then it will only accept 1.25” accessories. Most telescopes now produced come with a 2” focuser and drawtube diameter, enabling you to make use of the much wider fields offered by 2” eyepieces. Some actually come with 3”, or even 4” focusers, but these are generally used for photographic work.
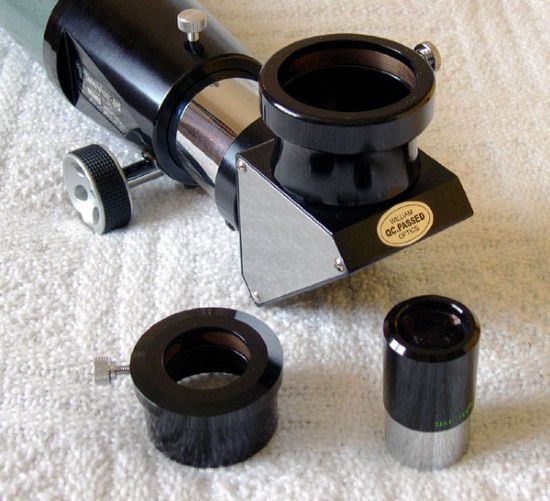
The mirror diagonal will be inserted into the visual back and held in place by one of two means. It may be held by tightening one, two or three small screws set into the side of the visual back, which press against the front tube of the diagonal and hold it in place. Alternatively, there may be a ring of brass or similar material inside the visual back. By turning a screw on the side, it will push against this ring, which will compress around the front tube of the diagonal, holding it securely in place. This is known as a ‘compression ring’, and these are much more highly favoured if you are going to be using heavy eyepieces and accessories, as they exert a more even force over a larger area than the small contact areas that the screw-types use. Another advantage is they do not leave the small pinpoint scratches or indentations on your eyepiece barrels that the screw-types do. Naturally these marks do not affect the optical performance of your eyepiece, but some people like to keep their equipment in as shiny and smooth condition as possible, especially considering the prices some of these eyepieces can command. You are not necessarily limited to keeping the visual back supplied with your telescope. If you would like to upgrade it, perhaps from one with screws to one with a compression ring, or for one that gives a more secure fitting, there are companies producing alternative visual backs for the majority of modern telescopes, including the Stellarvue and Synta / Orion / Celestron / Meade ranges. These cost very little and can offer a significant improvement in grip on the diagonal. Mercury Systems are one company in the USA who produce these, and they are very popular. They will ship internationally as well.
Having attached the diagonal into the visual back, the next step is to insert the eyepiece into the diagonal. If you are using a 2” eyepiece with a 2” diagonal, just pop it in and tighten the screw set into the collar that holds the eyepiece. This will hold the eyepiece in similar fashion to the way in which the visual back holds the diagonal itself. If you wish to use a 1.25” eyepiece in a 2” diagonal you will first need to use a 2” to 1.25” adapter. This sits in the 2” diagonal and has a 1.25” diameter aperture to hold 1.25” eyepieces. This is held in place by the ring or screws in the diagonal, and in turn it holds the eyepiece in place using either a screw or a compression ring. Some of these adapters are threaded to accept filters, and most diagonals now also have threads on their front ends to accept filters. This can be very handy for changing magnifications when using a filter, as you do not then have to constantly unscrew and re-screw the filter into the eyepiece barrels.
Different Diagonals
All diagonals are NOT created equal! Some use prisms to bend the incoming light into the eyepiece and some use mirrors to reflect it. Both types have their own sets of advantages and disadvantages. Prisms are generally cheaper, and come in 45-degree and 90-degree variants. This is the angle through which the light is shunted within the diagonal. 45-degree versions are very comfortable to use if you are using the telescope for terrestrial viewing, bird watching, plane spotting, etc., and are usually designed to give a correctly oriented image. This means that ‘up and down’ and ‘left and right’ show correctly through the eyepiece, and these are known as ‘amici prisms’. However, they are much less comfortable to use when viewing objects high up in the sky, as it can mean you end up looking upwards into the eyepiece, putting a strain on your back or neck. Prisms often have optical side effects too. They can cause a loss in light transmission that can slightly dim the image, and can quite often introduce false colour when looking at astronomical objects, especially when using telescopes with short focal lengths.
The ideal astronomical diagonal is the 90 degree mirror diagonal. When viewing an object, even at the zenith, an observer with a 90 degree diagonal will still be able to look easily and comfortably into the eyepiece without straining neck or back. Mirrors reflect light to the eyepiece, and so do not introduce the false colour that prisms can. But there are still differences between different mirror diagonals too. Note that using a mirror diagonal in a refractor gives an image correctly oriented vertically, but with left and right reversed. As with all things produced, there are different levels of quality and you do get what you pay for. Perhaps, more accurately, you don’t get what you don’t pay for. Most affordable good quality telescopes come with a diagonal and a couple of eyepieces, but quite often the diagonal may be below par. One factor to be aware of is how reflective the surface of the mirror is. You want as much light to be reflected into your eye as possible, so you should be looking for a diagonal that reflects a high percentage of the incoming light. The stock diagonals supplied with shop-bought telescopes such as Synta, Skywatcher, etc., may be only 80% to 85% reflective, which is not so good. Bear in mind that every optical surface (be it a mirror or a lens) the light from the star or planet you are observing comes into contact with will eat away at the brightness of the image, so you don’t want to use a diagonal that is only 80% light efficient. Good quality mirror diagonals, and there are many to choose from at different price levels, offer 90% to 99% reflectivity, and you really do notice that sort of difference at the eyepiece when you upgrade to one that is that much more efficient. Also, by going for a better model of diagonal, you may notice a more uniformly illuminated field through the eyepiece, with nice bright stars to the edge of the field instead of perhaps just in the middle 80%. Chromatic aberration around bright objects may even be reduced- it certainly was when I switched from a standard Synta 1.25” diagonal to my William Optics 2” model.
Anything else you need to know before dashing out and buying a ‘good mirror diagonal’? Well, yes actually. If you have a reflector telescope, you will know the ‘mirror’ actually has an aluminium coating applied to the surface. It is this coating that actually reflects the light, and in theory the glass underneath the coating does not have to be very special at all, as long as it is figured (or shaped) correctly. The same applies to mirror diagonals - they have a reflective aluminium coating applied, and it is this coating that bounces the light into the eyepiece. The coating can become worn or dirty over time, and so will require cleaning. Unfortunately, cleaning mirrors often actually damages the coating itself, and if you have to clean your mirror every few months you may notice that the image gets gradually less bright, or more probably you may damage the coating by scratching it. To combat these problems and further increase the reflectivity of diagonal mirrors, there is now a fairly recent addition to diagonal technology - the dielectric-coated mirror diagonal. Instead of using an applied aluminium reflective coating, the reflective material is actually vacuum deposited onto the glass underneath, resulting in a much more resistant and reflective surface. These dielectric coated diagonals boast reflectivity of 99%, or even more, and have much longer lifespans due to their resistance to damage, dust, cleaning, etc. Naturally they are a bit more expensive, but they may be worth the extra if you don’t want to be worried about replacing worn out diagonals, or simply want to own the best. Some of the latest diagonals you can actually collimate, meaning you can adjust the alignment of the mirror within, so the path of the incoming light to your eye is as straight and true as it can be, yielding the best view possible for your telescope (assuming the ‘scope is also collimated).
Click here to go to part 2