Dob Repaint
Repainting the GSO 680 8" f6 Dobsonian
I’m sure you appreciate the irony: Oxygen, the chemical element that is essential for us to live, gradually kills us. We depend on it, taking it inside ourselves in every lungful of air we breathe, and yet once inside us it oxidises and forms the destructive molecules known as free radicals, which contribute to cell breakdown and ageing. No surprise then that if Oxygen does this to the Human body, it can also destroy our telescopes.
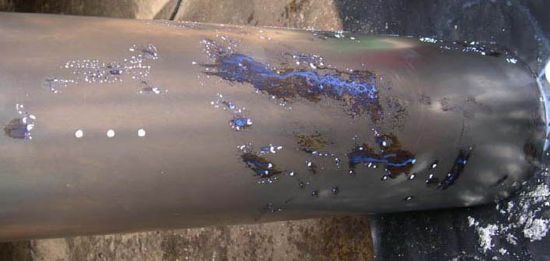
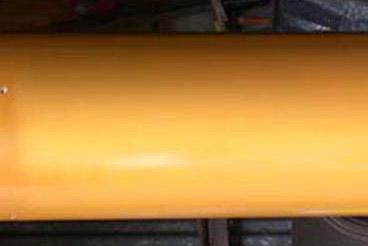
I’m talking about rust. Rust that slowly, insidiously, develops and starts to break down the properties of metal, eating through paint, and forming reddish-brown blotches of brittle dead metal on the surface of your (or in this case, my) Dobsonian telescope’s tube. Nasty. Pic 1 (to left) shows the extent to which rust had developed in the three years I’d had it.
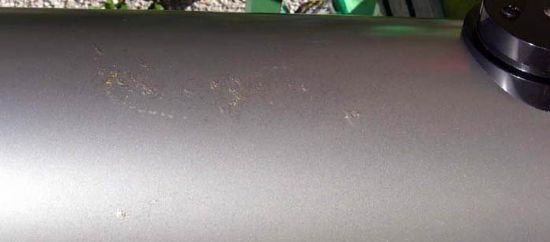
It was really quite bad, being concentrated mainly in two large areas around the middle area, but also spreading in smaller amounts into other parts of the tube. This was not a good situation, and I knew of only two ways to fix it. One was to strip everything off the telescope and put it back together on a new tube, and the other was to strip everything off the telescope, treat the rust, and paint the current tube. I chose the latter, as I fancied a change in colour. The silver grey was getting a little tired.
Having made the fateful decision, I immediately began to think about what colour to choose! I intended to use car spray paint, so that left me with a few thousand colour options available from Halfords! I considered Candy Apple Red, Apple Green, various shades of British Racing Green, Black, Sparkly Blue, and even one suggestion of Apricot Flash, but eventually saw exactly the colour I wanted on a car in my shop’s car park: metallic Peugeot Blaze Yellow.
Luckily, one of my friends, and a new member of the Highlands Astronomical Society, Angus Adcock, had plenty of experience with using spray paints, and was able to advise me on such arcane matters as primer, paint stripper and lacquer. Halfords was visited, and I obtained three cans of the paint, one of white primer, and one of lacquer. A medium size can of Nitromors paint stripper was also bought, and various pieces of sandpaper. I knew the other thing I’d need was time, so arranged to start the project when I had a week off work.
Disassembly
I’d never taken a Newtonian reflector completely apart before. The most I’d done was remove the mirror cell to clean the primary. To do this job I needed to remove absolutely everything from the tube; the trunnions, cell, spider, both mirrors, focuser, end rings, screws, the whole works! In actual fact, it was really quite straightforward removing all the pieces.
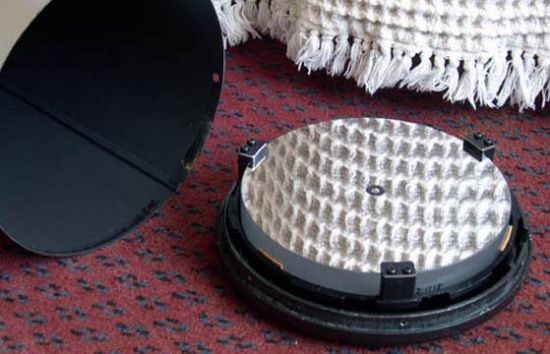
Literally everything was screwed on, and it was simply a matter of undoing all the screws with a suitable screwdriver and storing all the parts carefully. Oh, and remembering where each bit came from, of course! I took some photos as I went along, to show the steps I took, and the basic simplicity of removing the parts.
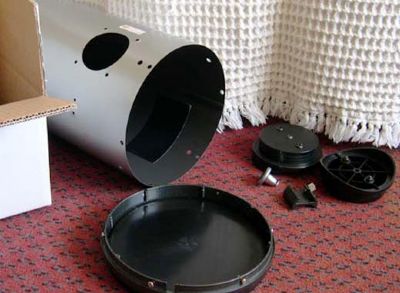
It only took a couple of hours to strip the telescope, until I had a completely bare tube with only paint and rust on it. All the other parts I stowed in a sturdy box and put out of harms way. Apart from the mirrors….
Knowing that I would have the telescope stripped down and inactive for a week or two gave me the opportunity (or excuse?) to send the mirrors away to be re-coated by Orion Optics in Crewe. They offer some very highly reflective coatings, known as Hi-Lux coatings, which increase the overall reflectivity of a telescope from the norm of about 75-80% up to about 94%. This means the images in the eyepiece will be brighter, so in effect the telescope will perform to a much higher level than before. Having already enjoyed some wonderful views through the GSO, I felt it deserved the pampering, so took the plunge. Sending the mirrors off to Orion Optics meant packing them up VERY carefully, and sending with extra insurance by courier. With that done, I could concentrate on the tube.
Send For The Stripper
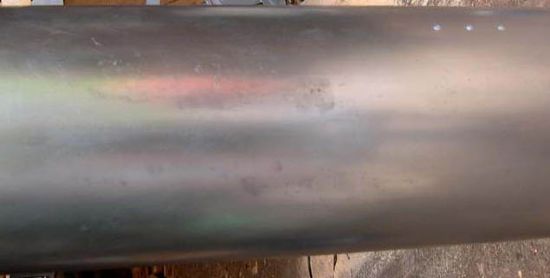
 I was lucky enough to be allowed to do all the stripping and paint work at a large isolated work-shed in the country. Before starting anything I masked off the interior ends of the tube to prevent the paint stripper removing the interior paint. Then it was a case of ‘painting’ the Nitromors onto the tube, using rough broad strokes, and watching the paint crackle and bubble up, before it simply fell away from the tube! Impressive stuff, this Nitromors. A quick spray down with the hose was needed to remove all the remains of the paint and stripper, and then the bare metal tube was revealed in all its glory. Or misery.
With no paint concealing it, the rust was plainly visible in many places, in large concentrated areas, and in thin spider-web like lines over the surface of the metal. Seeing it like this was quite daunting: what had I let myself in for? Maybe I should order that replacement tube after all!
Next step was to reach for the Ku-Rust and paint the mixture onto the rust using a small paintbrush. It was important to cover every single strand of rust, as Ku-Rust kills the existing rust, and helps to prevent new rust forming. Having painted it on, the mixture turns black as it ‘kills’ the oxide, and it hardens. Then when it’s fully dry, it is sanded off to leave as smooth and rust-free a surface as possible. This is what I did, applying the Ku-Rust several times to the worst areas, and sanding it away as it hardened and dried. I finished my work on day one by applying Ku-Rust to the very last rust remnants, and left it to do its work overnight.
The next day I sanded those parts down, and eventually was left with a much smoother and rust-free tube. It looked unquestionably better than it had when the paint came off, and was now begging to be primed, to cover up its shiny bare nakedness. Telescopes have dignity too, you know.
The primer needed to be shaken and shaken and shaken until it was 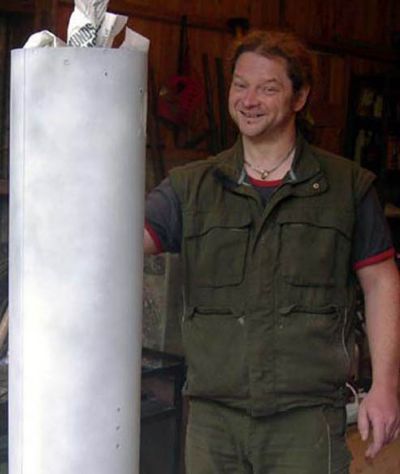 all mixed up completely (I know that feeling), and then it was time to apply it in long gentle sweeps. I was told the trick was to build up lots of very thin coats, rather than aiming the can at a particular point and trying to apply a solid coat all at once. It was a matter of moving around the tube, which was now supported on a raised block for painting, and moving the can in long sweeping motions so that it was always parallel to the tube, and just letting the fine paint particles alight gently on the tube. After each covering, it was left to dry for twenty minutes or so, before starting over again. The can of primer ran out before we had an even covering, so a second can was bought – this time I could only get red oxide primer, but that really didn’t matter as it was only to provide a base for the paint to stick to.
Once the primer had dried for an hour or so, the colour paint could go on. This also had to be shaken thoroughly. It was applied in exactly the 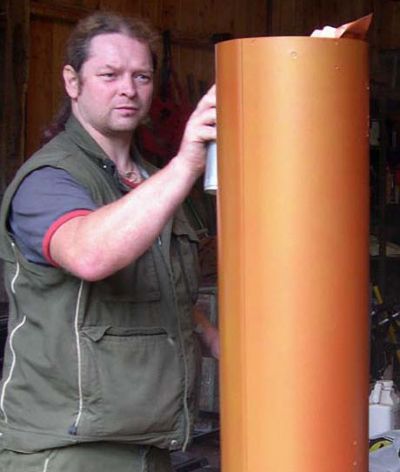 same way as the primer – slowly and carefully, leaving intervals between very thin coats. It took two or three coats before the paint coverage began to appear even, and a further one or two before it began to look like something that had been properly painted! This is how it was supposed to be – many thin coats with a gradual build up of paint. With the tube now looking well and truly ‘painted’ it was time to call it a day, and we packed the tube away for storage overnight.
Day three And Beyond
The paint I had chosen, Halfords Peugeot Blaze Yellow, was a metallic paint. Now, it may sound terrible, but apparently when applying metallic paint, the final coat should be very lightly sanded down with very fine sandpaper before applying the lacquer! This brings out the metallic part of the paint and creates the shine when the lacquer is applied. But before applying the lacquer, it makes the paint look absolutely flat and awful! It was a worrying time… But after only one or two passes with the lacquer spray (after it had been shaken of course) the difference was amazing! The paint shone and glinted, looking nothing like it had just moments before!
The lacquer serves a very important purpose too, it protects the paint, and therefore the metal tube. Each layer of lacquer applied slightly increases the protection, so I went for as many coats as I could get out of the can, which happened to be about four. The telescope does get used a fair bit, and is often put into and carried out of my car, so I thought I’d try for as much protection as possible to protect against the inevitable bangs and dings.
Having done that, it was left to dry for a few hours, then brought home and stored in a warm room for a week. During that time I didn’t touch it, I just left it to harden, dry and cure. After that time I began to inspect it, and found that I was really very pleased with the result, especially considering it was my first telescope repaint! It wasn’t perfect obviously, but I’m not telling where the ‘dodgy bits’ are! I felt that the paint coverage was at least as good as before, if not better, and the colour a lot more fun.
Customisation
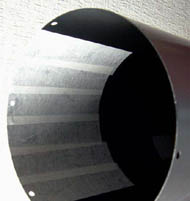
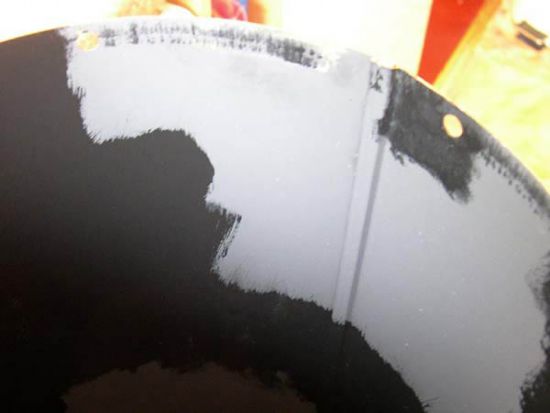 As I’ve already said, my reflector has never been completely stripped down before, so I thought about other things I could do at the same time to improve its performance even more. Something that is often recommended is blackening the inside of the tube. This can be done by applying black self-adhesive material, or simply by painting it. This serves to increase the contrast in the view by reducing any reflection inside the tube. Originally the tube interior was painted a semi-shiny grey colour, but after a couple of coats of Blackboard Paint it is now definitely much darker and non-reflective.
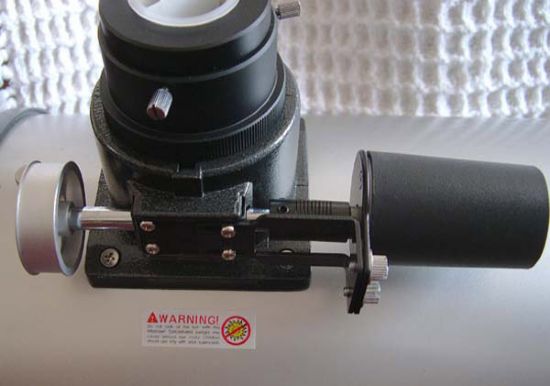
Since my last report on this ‘scope, I have also added an Orion Accufocus electric focuser. This is simply a small motor that allows the user to focus electrically instead of actually turning the focus wheels by hand. It may sound like overkill, but focusing by hand inevitably introduces vibration to the image, and it can be frustrating at high magnifications making a small adjustment, waiting for the image to settle, making another adjustment, waiting for the image to settle, etc. The motor attaches to the focuser shaft once one of the wheels is removed, and stays put by having two grub screws tightened against it. The motor connects to a battery box which has two buttons; one for focusing inwards and one for focusing outwards. There’s also a knob that can be turned to vary the speed of the travel. I’ve found this to be extremely useful, especially when viewing the planets, and it has completely removed any focusing vibration or oscillation. Not bad for £42 and 15 minutes to fit.
The mirrors came back from Orion Optics within a week of being sent to them. They usually suggest that it takes up to two weeks, but I was just lucky! I installed them when I was putting all the components back in the telescope tube, but I first re-marked the centre of the primary mirror for ease of collimation. Details of how I did this can be found here (link to previous article). The mirror cell on this telescope has always been a very tight fit, and it still was, even after I had sanded down the part of the cell that slips inside the tube interior. If I’m ever able to remove it again, I’ll also sand down the inside edge of the tube!
While I was in a sanding mood, I also had a go at the little nubs around the edge of the protective end-cap. These are supposed to make the cap fit snugly inside the end ring, but they were slightly oversized, meaning the fit was often too tight. A few strokes with medium sandpaper, and it is now a perfect fit.
I also noticed some spots on the end rings; top and bottom, where the grey mottle-effect paint had been chipped or scratched away. I had a tin of black Hammerite paint, and guess what – it’s EXACTLY the right shade to touch up areas like that and get them looking brand new again. A few spots with a small paintbrush were all that were needed.
The final modification was the addition of a Telrad reflex finder. I had so much trouble over the last season with my optical finderscopes dewing up that I decided to invest in one of these useful zero-power finders. It projects three concentric circles onto a small transparent screen that you look at the sky through. The rings have effective diameters of four degrees, two degrees and half a degree. When looking at the night sky through the screen, these rings are superimposed over the area of sky that you are looking at. You can then use the rings to work out distances from bright stars to dim deep sky objects (or even planets), and line up the telescope on them. Although I haven’t actually tried this device yet, I have used a borrowed one in the past and found it to be a very user-friendly finder.
Job Done
So with everything stuck back together again, and the telescope sitting on it’s rocker box, I could finally say the job was finished and that I was very happy with the result!
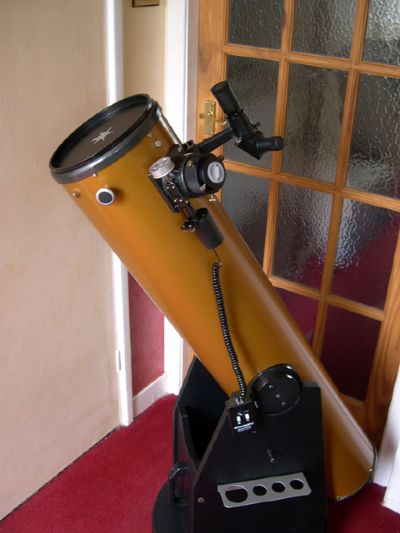
Collimation was required from scratch, and took a while because the secondary mirror support had been completely removed, and needed to be accurately centred within the tube when it was being reinstalled. Now it’s just a matter of waiting for viewing season to begin again so I can put the Dob through its paces again and see what differences the optical upgrade has made. The change in colour will make no difference to its viewing performance of course, but it will look nice while setting up in the cool evening dusk before dark autumn nights. And at least I won’t have to worry about the dreaded rust eating through the tube. At least, not for a while anyway…
Antony McEwan