GSO 680 Update
The GSO 680 200mm f6 Dobsonian - Updated
By Antony McEwan, February 2005
Well, I’ve had my GSO 680 for almost a year now. I’m guessing, by the way, that the name ‘GSO 680’ is based on the old Ferrari tradition of naming their cars after the engine specifications of the model. For example the beautiful ‘246’ Dino was so-called because it had a 2.4 litre V6 engine. In the same way I feel my GSO ‘680’ is so-named because it has a focal ratio of 6, aperture of 8 inches, and O Go-To computers! As I’ve lived with it for a while now, I have had time to look at a number of different types of object with it, and have had a chance to assess its strengths and weaknesses. Living with a mid-sized telescope is a lot different from living with and using a small telescope, so I thought I’d let you all know how I’d got on in year one.
Keeping Cool
One of the fundamental things about reflector telescopes is that they are very dependent on temperature equilibrium in order to give their best views on any particular night. That means if you take a telescope from a nice warm house (say 18’C) out into the cold January night (maybe –1’C) there’s a big temperature difference. Until the telescope mirror and the air within the telescope’s tube have cooled down to the ambient temperature, that difference will cause the telescope to give very poor views. This is a simple fact of life and people try to get around this problem in a number of ways. You can have the mirror made from a material that cools down faster (Pyrex for example); you can have the front end of the telescope covered with a clear optically null window to try and reduce the warm air in the tube from moving about so much; you can install small electric fans in the mirror cell or tube to pull out the warm air and so cause the temperature to drop more quickly. The simplest option is just not to take the telescope into the warm house in the first place! To this end I finally got around to emptying and ‘doing up’ my shed last summer so that the Dob has a permanent home and is always at, or very close to, ambient air temperature.
Guess what? - it works. It works really well! On the occasions when I’ve pulled the Dob out into the garden for a ‘quick look’ around I have never had to wait for the scope’s temperature to aclimatise. The symptoms of a telescope not being at ambient air temperature are views that boil and swirl around, always shifting and dancing about in the eyepiece. This is always worse at higher powers, and gradually improves as the temperature difference decreases. I have been able to pull the ‘scope out and jump straight up to powers of 170x or 230x with no movement in the image, so I think my solution works. I just keep it covered over with a plastic sheet in the shed to stop dust or creatures getting into it. Another thing to remember about any telescope is that once you bring a cold telescope back into the warm, condensation will likely form on the mirror or lens. If this is repeated often it can cause some damage to the coatings on the objective, or can encourage fungus to develop in places where you don’t really want it. Extreme examples perhaps, but they could be problems in the long term. Putting the ‘scope back to bed in the shed eliminates that risk too.
Construction Issues
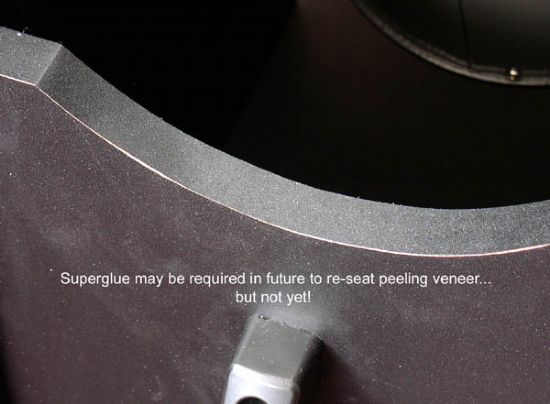
The base for the Dob is the basic rocker box which holds the tube and swivels around. Two semi-circular cut-outs hold the altitude bearings on the side of the tube and allow the tube to move up and down. This base came flat-packed and was easily constructed. It’s a little on the heavy side but you need that for stability. The ‘scope has been moved about quite a lot in its first year of ownership. It’s been carried out to the car, driven miles, set up, taken down, put to bed, tinkered with, etc. It has stood up to this quite well. The only sign of wear I can detect is a slight lifting of the veneer on the front top edge of the rocker box. It is not completely lifted, just beginning to. I’ll be standing by with the superglue when it finally lifts enough to get underneath it.
I have noticed that with prolonged use the azimuth (swivelling), motion gets a little bit stiffer. Obviously you want this to be smooth so you can track your targets easily. I find that it seems to be caused by the nut on the central bolt holding the rocker box to the base tightening slightly over a long period of time. A simple loosening of this nut occasionally is all it takes to get everything smooth again. The smoothness of this motion ‘out of the box’ was o,k., but it needed a little bit of a fix to get it just right. The time-honoured tradition is to cut out some discs from milk containers and insert them around the centre bolt between the base board and the rocker box, thus raising the rocker box somewhat off the bearings on the base and putting less tension on them. The number of discs needed varies between telescopes, and some people have used old records or CDs as an alternative to butchering milk containers. (Old albums will need to have their centre-holes drilled out to a large enough diameter to fit over the bolt, but it’s worth it to get rid of old Status Quo records…) In the end I cut some discs from old large margarine containers and that did the trick.
Apart from that modification the base has performed fine and entirely up to expectations. I can track planets at fairly high powers of 170x and 230x and can still catch up with them if I let them slip out of the field of view for a few seconds.
Mechanical Issues
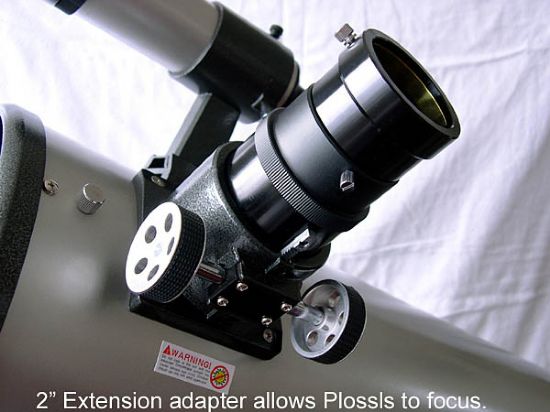
If you have already read my initial review of the GSO 680 you will know that I had a problem getting most of my plossls to focus. There was not enough out-travel so I had to pull the eyepieces out of the focuser slightly and then lock them in place to get focused. I mentioned in that review that I was awaiting delivery of a 2” extension tube to solve this problem. Well, the extension tube arrived shortly afterwards, and I want to tell you about this because it’s great. Teleskop Service didn’t just send me any old 2” extension tube; they sent me a finely machined, super-smooth extension tube, threaded for 2” filters at one end and with a brass compression-ring fitting at the other. It works perfectly, of course, and instantly solved the problem of focusing my plossls. Another big thumbs-up for Teleskop-Service, and they only charged half price as a conciliatory measure.
I also mentioned that the tension-springs were ideal for stopping the telescope tube from dipping when putting in heavy eyepieces. After using the scope for a while I’ll change that, and say that it does a fine job ‘most of the time’. I have noticed when viewing objects close to the horizon (for example M41, the Lagoon nebula, the Orion nebula etc) with a 2” eyepiece or one of my heavier Pentax XLs, the tube does end up dipping very slowly to the horizontal. I suppose this was to be expected, and the Pentaxes are quite heavy, plus there’s the weight of a 9x50 finder and bracket at the front end too. The solution was easy. I found that the tube is metallic, so any small mid-weight magnet can be placed on the tube near the back end to even up the weight distribution. This can be moved about too, depending on how much counter-balance is needed. Another solution I’ve used is to wrap a cheap elastic belt around the bottom end of the tube and just attach my small map-book to the tube with it.
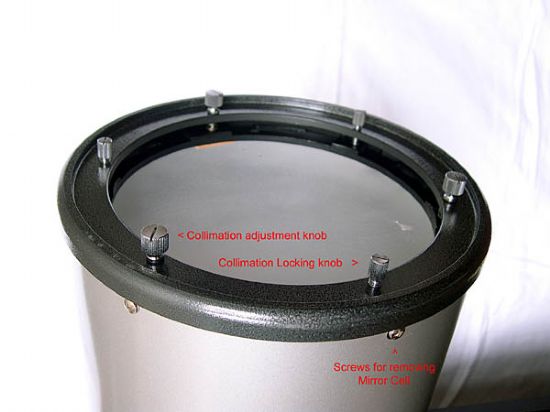
One of the modifications I have made to the ‘scope was to mark the centre of the mirror with a small black ring to aid collimation. This was done by my brother and myself one Saturday last autumn, and required the mirror cell to be removed, which posed an interesting problem. The cell is attached to the tube by means of several small screws, which were removed easily enough. The cell then slots over the end of the metal tube and simply slides off, once the screws are detached. Except it didn’t! It was a very, very snug fit, and to remove the cell I had to actually tap it off very gently with a light pin hammer carefully swathed in soft cloth so as not to jar anything or scratch the tube. The mirror was then centre marked with a small black self-adhesive paper ring. The refitting just required the cell to be tapped back into place, but I applied a tiny amount of white grease to the edge of the tube to make it easier when it comes off next time… It is now very easy to tell if the ‘scope is collimated - the small black ring on the mirror helps to get everything lined up concentrically in the focuser when checking it by eye.
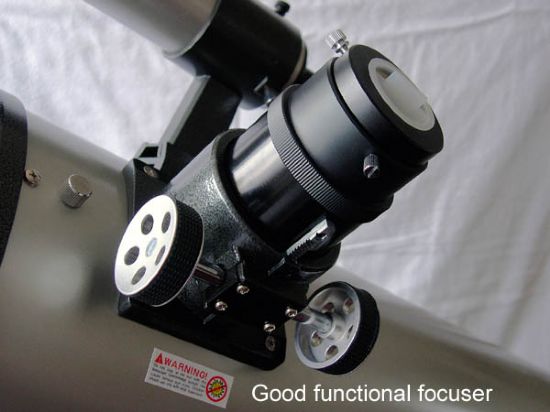
Mention should be made of the focuser here. No issues, just that it is very good. I have not re-greased it at all, which is surprising as that’s usually the first thing I do to a Chinese telescope, but in this case I don’t feel it needed it. It moves quite freely and stays in position very well. The only change I made was to replace the stock plastic focus wheels with nice shiny aluminium ones of a slightly larger diameter. I can actually hear the grease moving on the pinion as I turn the focuser wheels, but it hasn’t affected the focusing operation yet. Maybe when I’m bored one day I’ll re-lube it.
The telescope holds collimation very well too. I generally don’t even have to touch the collimation knobs for many weeks on end. In fact the last time I adjusted it was when my brother and I ‘dotted’ the mirror centre, and that was last year. Overall, the sense of solidity I experienced when I first received the ‘scope was pretty accurate. Everything has stood up really well in its first year mechanically, and I don’t foresee any mechanical problems looming anytime soon.
Optical Performance
I am not an expert on optics. I can’t tell the difference between a 98.3% Strahl ratio telescope and one with 99.5%. I don’t know how to tell if my mirror has a ‘zone’ on it, or if my refractor has 5% under-correction. However I can tell a good eyepiece view from a bad one, and I know to what extent ‘bad seeing’ can affect the view. With this in mind I have to say that the optical performance has been very good. I haven’t owned another 8” telescope so I can’t say whether this exceeds expectations for 200mm of aperture or falls short of them, but I have had lots of very good views so I think it’s doing fine!
One of my intentions was to use it for planetary viewing as an upgrade from my 127mm Maksutov, and it has way outperformed the smaller Mak. The images of Saturn under good seeing are fantastic, with multiple subtle bands across the globe, shading across the rings, sharp black Cassini division and regular views of the C-ring. The Moon shows great detail at high power, and the contrast is very sharp between areas of light and shadow. At low to mid powers the Moon is very bright through 8 inches of aperture, so I invested in a set of polarizing filters to cut down the glare and keep the brightness to a comfortable level. As magnification increases this becomes less necessary as the image dims anyway at high powers.
I have also viewed several deep sky objects and been impressed with the results:
M57 is very nice at 150x and on nights of excellent seeing (yes, they do exist) I began to see slight variation within the actual ‘ring’.
M31 is a showpiece object and with a wide-field eyepiece is very bright across the field with quite a sharp bright centre.
M42 shows a lot of high-contrast green-blue nebulosity, and the Trapezium stars are very bright pinpoints of light within the nebula. Using a Lumicon 2” Ultra High Contrast filter showed even more nebulosity, but lost the 3d-feel the filterless view provided. I look forward to really challenging the ‘scope to find at least the ‘E’ star in the Trapezium if seeing permits. I’m still in two minds as to whether the view is as sharp as in my Televue refractor though…
M1 shows up as a large, bright swirling nebula, and this ‘scope provides the best telescopic view I have seen of this object.
The Double Cluster shows dozens of stars in each cluster, and the colours of the older red giants show as various shades of red. A very nice view. I have also viewed Comet Machholz recently, and saw the elusive (to me) visual tail from a very dark site.
Overall I’m very pleased with the optical performance of the ‘scope, but ‘seeing’ does play an important role in that. As well as the good nights there have been nights when it’s been virtually impossible to even hold a bright star in focus, and that’s when I know the seeing is so bad that it’s time to go inside. One thing I do like about the view through a reflector is the way that bright stars throw up nice diffraction spikes - it makes for a very pleasing view, particularly in rich star fields.
Plans and Conclusions
There are still a couple of issues I want to address. With the focuser being so close to the open front end of the tube it is quite susceptible to skyglow, which brightens up the background sky view in the eyepiece. Adding a light-shield, or basically a tube extension to the front of the tube, should reduce or remove this irritation. I am still toying with the idea of adding a wire mesh behind the mirror cell to keep out small bits of rubbish, but to be honest I have not noticed any small bits of rubbish getting into the tube at all, so maybe that is not worthwhile. I may still re-lube the focuser, but at the moment it could be a case of, ‘If it aint broke, don’t fix it’.
If you’re looking for a mid-size Dobsonian reflector for bargain money be assured that mine has delivered wonderful views. You do have to be prepared to give up a little space for the ‘scope, as it is not small. You also have to be prepared to maintain the ‘scope - keep it in collimation, keep the motions around both axes operating smoothly, keep everything covered up when not in use. So far year one has been a lot of fun, and I’m looking forward to discovering even more in the sky with this great telescope.
So far my 680 has been a lot cheaper to own than a Ferrari 246, probably more usable, and almost as much fun! At least until my six numbers come up....
The original review can be read here.