Helios Apollo 150
By Maarten de Vries
It took almost 4 months before I found the telescope I decided to buy. My budget was £500 and I wanted something with a good bit of aperture for the money. I also wanted a sturdy equatorial mount to do some photography and, if possible, something that was both easy enough to set up and small enough to be left set up in the living room.
I must admit that searching for that telescope has been great. I learned more about telescopes in those 4 months than I had in all the years before. Most of the information I needed I found on the Internet.
 It was years ago in Glasgow that I spotted a Tal telescope. I went back to that shop to see if they could give me some details about it, and they promptly provided me with a catalogue from Optical Vision Limited, showing the full range of Tal telescopes. In the same catalogue, however, I found an extensive range of telescopes from the Helios brand and decided to find out more about them. During my travels on the Internet I discovered that these telescopes were not only very economically priced, they also got good reviews from some of the leading suppliers, so I decided to select a scope from this range. My eye fell on the Apollo 150, as this scope was well within my budget and provided 6 inches of aperture. Furthermore, it came with what was then the heaviest of equatorial mounts they supplied and it featured a corrector lens, which made the whole tube assembly very short for its 1000mm (f/6.7) focal length. In other words, pretty much what I was looking for.
I first tried to buy it from Sherwoods Photo in Birmingham. They sold the complete set for only £399. However, when I was ready to place the order, they wanted to talk me out of it and sell me something else (it appeared they didn't have any in stock). Not a smart move, because I decided to call OVL who recommended speaking to Dark Star Telescopes in Wales. They turned out to be very friendly indeed and, not only that, their price (£440) included delivery as well as a thorough examination of the scope before dispatch, plus the supply of an integrated Mylar solar filter. The scopes were on back order, however, and mine came about 2 months later (apparently, the Apollo is very popular and, whenever a new batch arrives, they are sold out in no time). It arrived in a single but largish box.
First Impressions
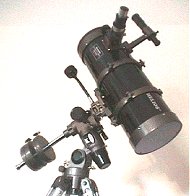
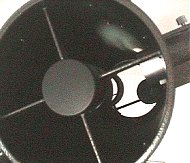
 The first impression of the scope is that all parts look nice and chunky, with surprisingly little plastic used. It is a remarkable heavy scope for its size. The tube assembly, which is only 60cm long, weighs about 6 kilos! It is pretty fat though, at about seven and a half inches in diameter, possibly the fattest 6" scope on the market. The tube is fitted with two 40mm by 5mm thick (!) rings at both ends (a la Takahashi Astroscan). The one at the bottom holds the mirror cell, the one at the top has an integrated spider for the secondary. Both rings are fixed to the tube using six M4 bolts. The tube boasts a very chunky 1.25" focusser which has a very nice action with hardly any backlash or flexing in it. It incorporates a tube that can be unscrewed to reveal a T2 thread on which a camera can be mounted.
The mount is very sturdy and an almost exact copy of the old style Vixen Super Polaris mount. It even boasts an integrated polar alignment scope. It sits on a tripod which is of exactly the same make as those used by both Celestron and Meade for their field scopes. Very sturdy indeed. The mount does not have a quick release mechanism, which is a bit of a pity. To take the scope off the mount you need to take the scope out of the tube rings. However, the mount is very easily lifted from the tripod using a single bolt assembly. That way I can carry the scope out in two parts, which only takes a minute. The tripod has a large accessory tray with a high rim, so you can pack it full of stuff without having anything dropping off it, even when carrying it outside.
Using the Scope
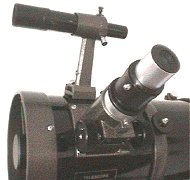
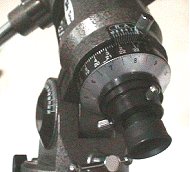 The scope comes as standard with flexible slow motion controls and two good, fully coated, Plossl type eyepieces, one 10mm and one 20mm. Both eyepieces boast an apparent field of view of 50 degrees and have only the slightest of chromatic aberration. You also get a very compact large aperture, fully coated, multi element 2x Barlow lens. Finally, there is the 6 x 30 finder scope, which does not have any facility to focus, but provides a very sharp image for me. It is also fully coated and is fitted using a very solid and tall quick release bracket. Because the bracket is tall, it is easy to get access to the finder. Adjustment is done with two screws which are positioned at an angle of 90 degrees from each other, making adjusting the finder a matter of seconds. Furthermore, I have found that once I have done this, I rarely need to do it again. The whole finder and bracket comes off in seconds. I use the finder a lot and am impressed by how easy it is to use. The setting circles are quite small and not very accurate, which is not a problem for me, but some people insist on using them to find objects. I am quite handy with star hopping and handling the scope for that purpose is simple for me.
Viewing is a pleasure and images are sharp. Because of an ingenious system, using a very fast parabolic mirror and special corrector lens in front of the secondary image, you get images that are sharp all the way to the edge. By comparing images with those of other scopes of the same aperture, I found out that there were a few things not entirely right. In the end they turned out to be both cooling and collimation problems. Although the collimating bolts are hidden behind a steel blanking plate, you can collimate the scope yourself. The first time you do this you find that the collimation bolts have been fixed using some sort of silicone putty. Collimating the scope improved the image dramatically and the cooling problems can be overcome by leaving the scope out for a longer time before using it. I did, however, notice that the scope takes a lot longer than I find handy, i.e., up to several hours, before the final 'chimney effect' has disappeared. To solve that you can either leave the blanking plate off, or build a small fan into it. The latter is what I did and the results are impressive.
Motor drives
 Because my interests are in photography, I decided to buy the dual axis drives. This is a costly affair and will set you back about £150. Fitting the drives is easy but, to get it right, i.e. to get rid of most of the backlash, you need to do a lot of adjusting. I finally ended up with changing the way in which the declination motor is fitted to the scope by making another bracket for it, so that it drove the declination worm directly (rather than via a bit of a clumsy gear system). I also adjusted the worms (which is not easy, but quite cleverly done). The results are o.k., but nothing impressive.
The control box is easy to use and runs on 4 big ‘D’ cells that go in a separate holder. One of the buttons kept coming off, but I have fixed that. The green led light is a bit bright, but that can be fixed with a bit of red plastic. The maximum speed is only 8 times sidereal, which I find somewhat slow for adjusting the image. I wouldn't have minded a 16 times setting as well. The control box is also a bit sensitive to the cold and makes the declination motor go funny when too cold. However, the batteries seem to last forever, which is quite good, and there seems to be little in the form of periodic error, since, when I align the scope well, I can go away for an hour, and the object is still well within view!
Some other Tips
Besides adding a fan and a bracket, the only other ‘modification’ I made to the scope is putting some Velcro pads on the back of the control box and on the tripod, so that I can easily put the control box away, without losing it among all the stuff that is lying in the accessory tray. Not only that, when the control box is stored that way, you can use it without having to take it into your hands.
Fixing a camera to the scope is easy. By screwing off the eyepiece holder and attaching a T2 adapter ring, most cameras can be attached in seconds. There is even a facility to ‘piggyback’ an SLR. This facility is not ideal, as it provides only a very small surface for the camera to sit on. The camera can therefore not be tightened that snugly. This is especially a problem when using larger lenses and you can quickly misalign the camera during a long exposure shot. I think my next modification will be to fix a better camera platform to the back of the tube rings. This should not be difficult as both tube rings have an accessory hole in the top. I did use the scope for some piggyback photography and the results can be seen below. These images were taken using a very cheap (and very heavy) Zenit E camera with a standard Helios 58mm f/2 lens.
I have also modified a webcam so that it can be fixed directly to the focusser. I use this camera to take images of some of the planets and the Moon (see below). The results are quite remarkable. The drive motors are a must here, as the magnification is quite high and it is very difficult to keep the object in view long enough to make a proper exposure.
The Verdict
I think that at £400 the basic package is very good value for money if you are looking for a 6" f/6.7 or thereabouts. The mount is very sturdy and easy to use, although the setting circles are not great. The eyepieces that come with the scope are ace but collimation requires a bit of experience, and the whole scope is fairly heavy for its size. The expensive (£150) motor drives are somewhat disappointing but, after some work, quite adequate. Batteries last forever. Setting up the scope using the polar alignment scope is A1 and the finder works a dream.
I think that this is a fine scope but perhaps not really for beginners, due to some of the adjustments needed to make it perform at its best. It does fit the requirements I had at the time I bought the scope but I can see that at some point I would possibly want something with perhaps more aperture and better drives.
Maarten de Vries, January 2002