Members Mods – “Let There Be Light!”
Celestron 11” SCT Visual Back – 56% Increased Effective Aperture at (Very) Low Cost
by
Eric W. Walker – 18 October 2019
Highlands Astronomical Society Aims:?
KISSAstronomy – Keeping It Simple, Straightforward, and Accessible (Affordable & Amateur)
Background
In the early-2000 ‘noughties’ Schmidt-Cassegrain telescopes (SCT) for amateur astronomers became more affordable and major suppliers designed and began to supply 11” aperture models to complement their already popular 8” ranges.
Amateur astronomers demanded that these larger aperture scopes be provided with larger aperture eyepieces and accessories and, consequently, eyepieces of 2” were marketed in addition to the 1.25” equipment already established for the smaller scopes.
The 2” equipment used the standard 50mm screw thread which was widely used on the unchanged telescope backplates (‘visual backs’) with no thought given to the limiting impact on the amount of light which would be transferred to the astronomers’ observing eye. The visual back effectively acted as a ‘field stop’ which ensured that your expensive 2” equipment could not perform as it had been designed.
From the mid-2000 ‘noughties’ Meade and Celestron did modify the visual backs for their larger scopes but the increase in effective aperture was not as much as it could have been.
Here is an example using measurements of the original visual back of my own Celestron 11” SCT with various combinations of 1.25” and 2” eyepiece equipment.
| Equipment Combination | Limiting ID (mm) | Light Transfer Improvement (%) | |
| Original Visual Back (ID=37.9mm) | 1.25" diagonal + 1.25" eyepiece | 28.0 | 0 |
| 1.25" eyepiece | 28.0 | 0 | |
| 2" diagonal + 2" eyepiece | 37.9 | 83 | |
| 2" eyepiece | 37.9 | 83 | |
This data shows that although there is an 83% increase in light being transferred to the astronomer’s eye when using 2” equipment (not to be sneezed at!) the limiting factor is not the internal diameter (ID) of the 2” equipment but, in fact, the ID of the visual back.
I searched the internet for a visual back which would maximise the ID of my 2” eyepiece equipment to ensure I was getting the best performance possible. I succeeded! Here is an example of what I found – the Peterson EyeOpener III Visual Back. Exactly what I require and I was giving it serious consideration when I read the price which knocked me for six - £79.99 (incl. VAT) from a well known and respected online UK supplier.
Not for me! That performance improvement is way too costly.
In the new found spirit of Highlands Astronomical Society I worked on how to achieve its aim of KISSAstronomy – using home 3D-printing technology and simple CAD design.
Recently, I have modelled many of the screw threads which are used commonly in amateur astronomy and photography and knew that I could incorporate some of these threads to design a visual back for my 11” SCT which would allow maximum light to pass to, and through, my 2” eyepiece equipment.
Method
Out came the digital caliper and I measured the exact diameters and dimensions of the existing visual back, 2” eyepiece barrel, and 2” mirror diagonal barrel.
Using CAD software Fusion 360 I spent just under two hours designing the new visual back and locking screws which would maximise the light transfer, be a secure fit, and allow easy rotation and changing of equipment in the observatory.
I printed several test pieces to ensure that the 3D-printer (Creality Ender 3) would produce a part of the highest quality using black PLA filament, which I determined to be suitable for this print job (right material for the parts, ease of printing (printability), and cost effective).
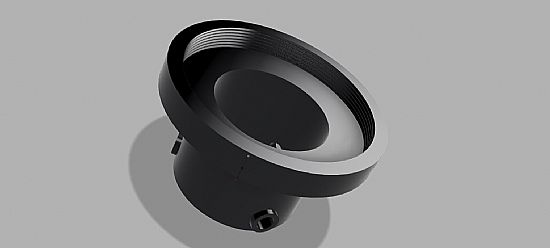
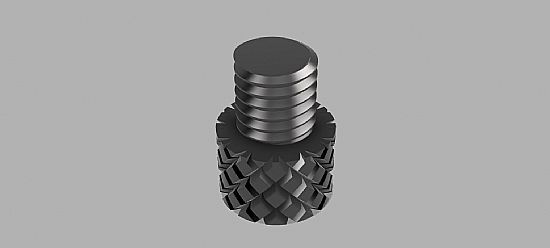
Fusion 360 CAD images of the tri-lock visual back & locking screw (3off)
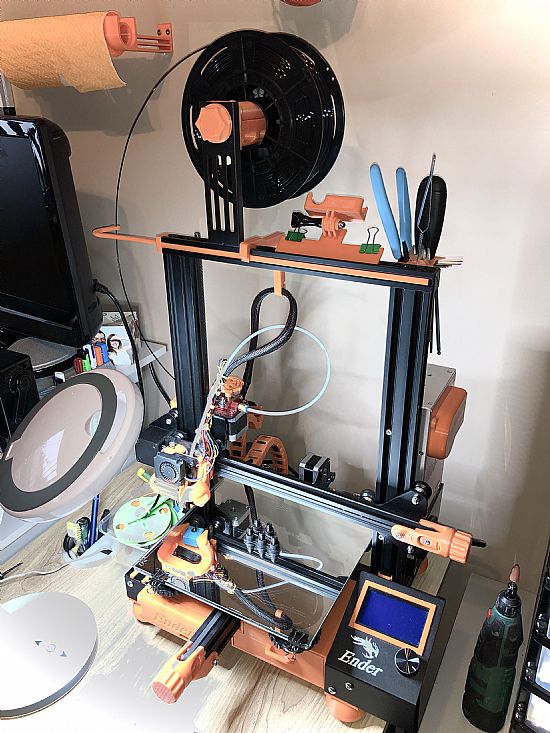
3D-Printer (Creality Ender 3)
Print details
| Visual Back | PLA filament (black) | 22.5 metres | 67.7g | £0.61 | 6h 41m print time |
| Locking Screws | PLA filament (black) | 1.2 metres | 3.6g | £0.03 | 55m print time |
| Total | PLA filament (black) | 23.7 metres | 71.3g | £0.64 | 7h 36m print time |
I tapped 8mm threads into the lock screw holes on the visual back and gave the lock screw threads a “clean up” with an 8mm tap die. I placed a 2mm square piece of electrical insulating tape on the tip of each locking screw which gives a good grip between the screws and the eyepiece barrel and ensures the equipment doesn’t accidently rotate when you are observing.
Result
I’m very pleased with the outcome! The visual back is exactly the size it needs to be, it is robust, looks good, and, most importantly, it has increased the amount of light passing through the 2” equipment as desired. Also, at less than 1% of the cost of the commercially available visual back I am one very happy amateur astronomer!
Using the 2” eyepiece alone, the increase in light being transferred is a whopping 56% compared to the equivalent set up using the original visual back!
Note that it is the dimensions of the components of the 2” equipment which is now the limiting factor, not the visual back itself. I think I could redesign the 2” mirror diagonal fitting to improve it further but, at a 22% improvement, I’m not going to complain.
| Equipment Combination | Limiting ID (mm) | Light Transfer Improvement (%) | |
| Original Visual Back (ID=37.9mm) | 2"diagonal +2" eyepiece | 37.9 | 0 |
| 2" eyepiece | 37.9 | 0 | |
| New Visual Back (ID=50.8mm) | 2" diagonal + 2" eyepiece) | 41.9 | 22 |
| 2" eyepiece | 47.4 | 56 | |
(Just for interest, there is a 124% and 187% improvement respectively over the 1.25” set-up using the original visual back; the increase in orifice area from old to new visual back is 80%).
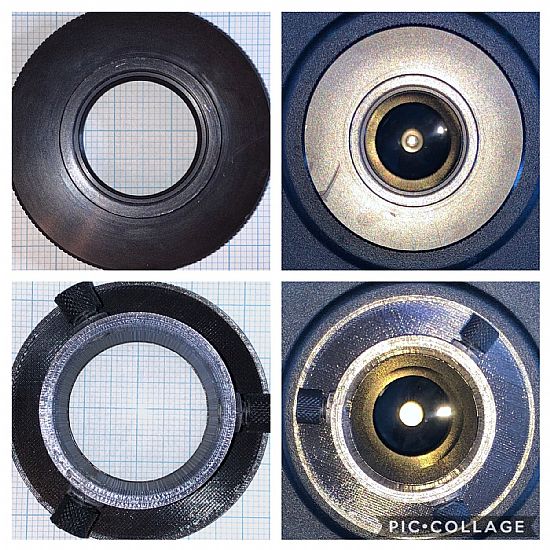
80% increase in visual back orifice area with the 3D-printed new design
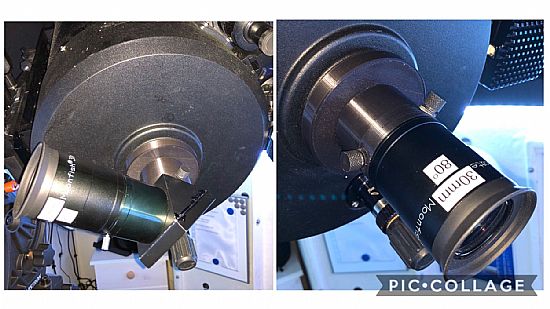
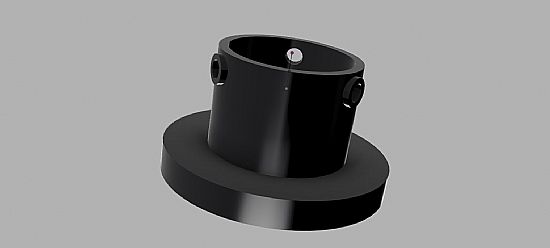
New visual back fitted to Celestron 11” SCT with 2” equipment attached