Skymax 127 SupaTrak
By Antony McEwan
 Telescope mounts are an interesting problem. You need a mount to attach your telescope to so that it will be supported while pointing at the stars, Sun or planets, but there are a lot of things to be weighed up when choosing a mount for your telescope. To hold the telescope securely and firmly the mount must be stable – but that may mean it has to be heavy. To be smooth in its motions across the sky it must be well engineered – but that may mean it has to be costly. To track objects across the sky the traditional purchase might have been an Equatorial mount with added dual-axis drives – but they can be a fuss to set up every observing session.
Well not any more. There is now a new option for the observer in a hurry that wants built-in tracking on a non-equatorial mount: the SupaTrak by Skywatcher.
The Package
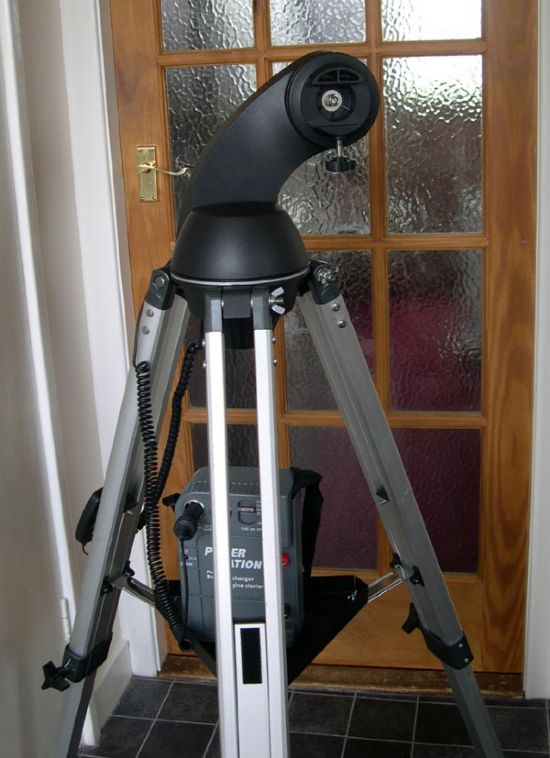
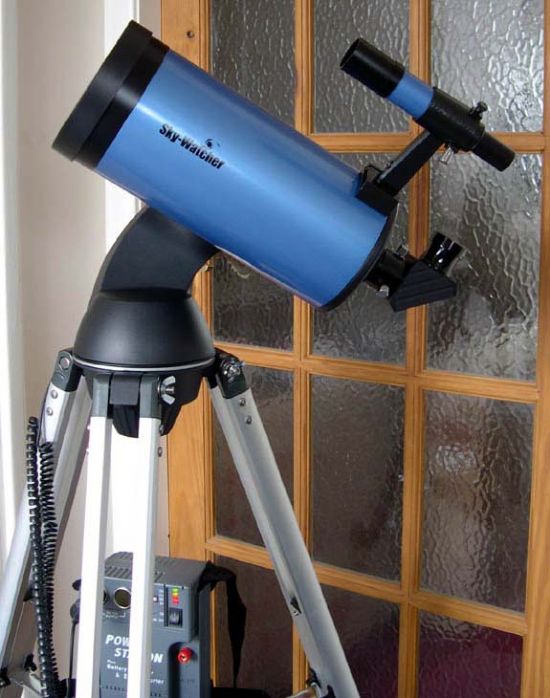
The SupaTrak is a single fork mount with built-in motors and a hand-controller. It comes with its own aluminium tripod and is available in two packages: one with a 127mm Maksutov (for about £300) and other with a 130mm Newtonian tube assembly (for about £200). It is also available as a mount-only purchase (about £150).
When I first saw these beginning to pop up on websites and adverts in the astronomy press, I got interested. I’d had a 127mm Maksutov a few years ago and thoroughly enjoyed using it. I like alt-azimuth mounts, but I also like having the convenience of tracking motors. So, I thought I’d give one a try – just out of curiosity…
 I ordered the Skymax 127 SupaTrak package from Beacon Hill Telescopes and waited for the box to arrive. When it came, the whole package was contained in one large brown outer box, within which was another retail box, and then inside that the individual components were individually packed in yet more boxes! The mount was separate from its tripod, and also included were an accessory tray, the hand controller and a battery pack. From reading I had done on the Internet, I knew that the battery pack ran off eight AA batteries and would supply power for about two hours. I haven’t used it yet, preferring to use a 12V rechargeable external power supply.
The optical tube assembly had a box to itself, and the other accessories shared a further box: 6x30 finder-scope and bracket, 1.25” 90 degree mirror diagonal, and two eyepieces of 25mm and 10mm focal lengths. It only took a few minutes to assemble the package following the included instructions, but even without the instructions it would be very straightforward.
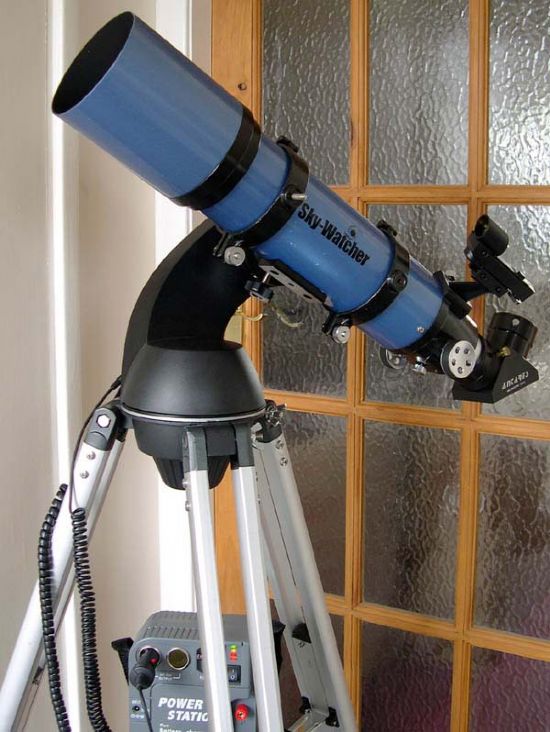
The tube assembly attaches to the mount by means of a dovetail bar that is attached to one side of the tube. Now this is one of the truly great things about this mount. The mount will accept any Vixen or Synta/Skywatcher/Orion style dovetail plate, which means that any appropriately sized telescope can be used on the mount if it has one of these dovetails attached. One of the reasons I bought the mount in the first place was to try it with my ED80 Apo which has a Skywatcher dovetail, so I was very pleased to be able to attach it simply by sliding in the dovetail and tightening the retaining knob.
 The build quality of the mount feels very good. It looks plastic on the outside, but it feels reassuringly heavy and strong when it is handled. I used to have a Celestron SLT single fork mount with GoTo and tracking, and this mount feels slightly sturdier and heavier than I remember the SLT being. On the other hand, the tripod that comes with the SupaTrak uses the same legs that usually go on EQ1 mounts. They are quite thin and it was easy to induce some flexing by grasping the mount and twisting. I instantly resolved to replace the legs with sturdier ones, but not before first light…
First Light
Location: back garden. Conditions: clear and cold. Unfortunately, there is not a lot of viewing potential from my back garden as there is a street light in every direction, but I can at least spot brighter stars and the planets. To test the mount I used my ED80 and set it up according to the instructions. This meant making sure the tripod was level (using a spirit level) before screwing on the mount head. Then the ‘scope was attached and the power supply plugged in and switched on. The ‘scope tube should then be pointed towards north and levelled horizontally. The package included a compass, but I could make out Polaris so used that as a guide. The fixed part of the fork arm mount has a latitude scale and the portion that moves in altitude has a pointer. When the telescope moves up and down, the pointer moves and points to the latitude or degree angle that the scope is pointing at. When it points to zero, the tube is level, when pointing at 90, it’s at zenith.
 Now the basic set-up procedure is to point it north, set altitude to zero, switch off and on again, and then when tracking is enabled it should track celestial objects. But there is a more accurate way of setting up for better tracking accuracy. This involves pointing north, levelling the tube, switching off and back on again, and then using the hand controller to move the telescope so that the latitude pointer points to your latitude on the scale. Of course, this means that you basically just slew the scope until Polaris is in the field of view! Having done that, press the 'fast' and 'slow' slewing buttons together, and the tracking should be that bit more accurate.
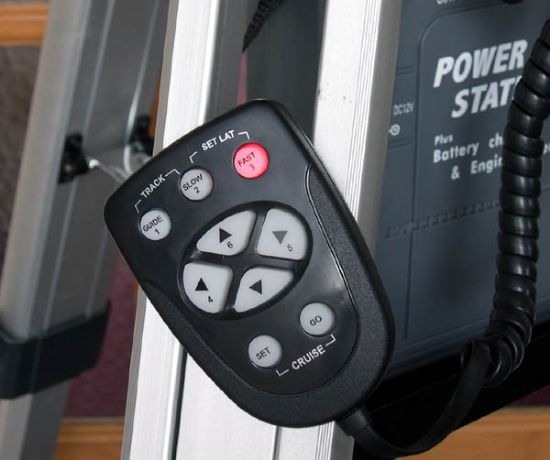
Tracking is not automatically activated. The hand controller has four direction buttons, three speed buttons with alternative functions listed, and two more buttons that relate to terrestrial observing functions. When tracking is not activated, the slew speeds are set at 32x, 64x and 800x sidereal rate to allow you to quickly slew to targets in the sky. When tracking is activated, those slew speeds are changed to 1x, 4x and 8x using the same buttons. Very neat! Note that moving the telescope manually without using the hand controller is not an option. It can only be moved by using the controller so a reliable power supply is essential. The controller itself is quite small, measuring only 9.5cm by 7cm at its widest part. The buttons are backlit red and flash when an instruction is keyed in. When tracking is activated, the speed button that was last used flashes to indicate that tracking is ‘on’. Once the latitude is set, the idea is to disengage tracking, slew to the target using the fast rates until it is in the eyepiece field of view, then enable tracking and use the slower rates to centre the object and tweak its position. That’s fine in theory, but how did it hold up in practice?
The two targets I used as test subjects were Mars and Castor. I used a Meade 6.7mm eyepiece in my ED80, giving 89x magnification, and got ‘locked on’ to Mars first. Detail was apparent of course, but I was testing the mount rather than the scope, so I got it centred using the arrow keys, made sure tracking was enabled, and went inside to make a cup of tea. When I returned about fifteen minutes later, the planet was still within the field of view (about 1 degree – it was an ultra-wide eyepiece) but had drifted somewhat. Nevertheless I was very pleased! I then slewed to Castor and repeated the test. Same result! The tracking seemed to be quite good.
Initial Issues
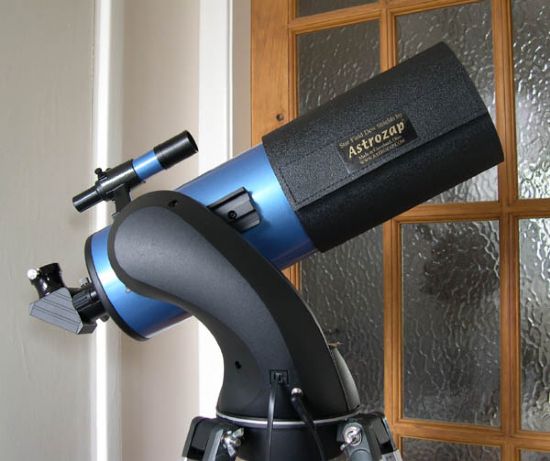
Other issues did reveal themselves though. Focusing resulted in much shaking of the view, which I attributed to the somewhat flimsy tripod legs and plastic accessory tray. Also, the power supply jack plug kept on coming out of the socket, which disrupted the power supply, and meant starting over every now and then. I resolved to have a go at fixing these issues before abandoning hope and resorting to sending it back for replacement.
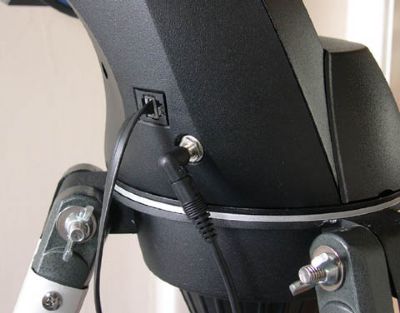
Image shows power plug inserted precariously before modification.
Making enquiries on one of the Internet forums got me some good advice about the power supply jack plug. Inside the input socket on the mount is a male split pin that inserts into the female aperture of the jack plug. Unfortunately, the two parts of the split pin were not sufficiently separated to exert any force or grip on the jack plug. A few minutes of trial and error with a sharp modelling knife later, I had prised the two parts a little further apart and the grip was much improved. It now took a bit more effort to yank the plug out of the socket. It was still not great though, so I realised that the strain must be taken away from the point of contact. A loop of electrical tape wrapped around the mount to hold the power cable in place seemed like a simple enough temporary fix, and worked well enough. Velcro attached to the cable and mount would do the same job.
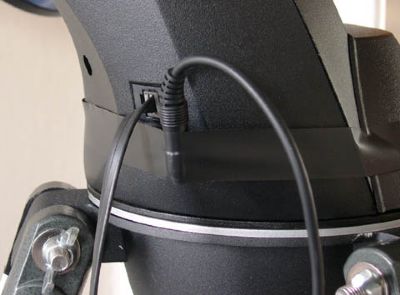
After modification the plug is much less likely to pull out.
The problem of flimsy tripod legs required more effort. I acquired a set of legs from a sturdier EQ2 type mount, complete with attachment bolts. When I took the original legs off the SupaTrak the attachment bolts were slimmer – 6mm diameter instead of 8mm. The holes drilled through the hub were also 6mm, so I needed to enlarge those holes to ensure the new legs would attach. The hub is aluminium, and quite strong, so I fished out the old power drill and got to work, gradually enlarging the holes until they were a clear 8mm diameter. The new legs then simply bolted on, with a pair of washers taking up the extra space created by the larger width of the legs, and I added a sturdier metal accessory tray too. Hey presto – much more robust! The ‘grasp’n’twist’ test was passed easily: no twisting and the whole unit felt reassuringly sturdy. I was chuffed and looked forward to ‘second light’…
Second and Third Lights
…Which took place at a local dark sky site on a cold December night. I set up exactly as I had before and started observing. The focusing jiggle with the ED80 was slightly improved but not completely eliminated. When I owned the Celestron SLT mount I had attached a TeleVue85 refractor to it in the same way as my current SupaTrak/ED80 combo was set up and the SupaTrak dealt with the weight much better than the SLT did. Now on this second night the tracking was not as good as it had been on the first night. I reinitialised a few times and then resorted, as everybody must occasionally, to reading the instruction manual. It seems that to maximise tracking accuracy and minimise backlash errors it is important to use certain direction keys when setting up rather than others. For example, when levelling the tube and when pointing at Polaris (setting latitude) it is recommended to finish those procedures using the / and > buttons. Also, whichever of those keys I use last when levelling the tube before resetting the power, I should then make sure it is also the last one I use before setting the latitude after acquiring Polaris in the ‘scope’s finder. I think I’d missed that. By the time I’d realised this it was too late to do anything about it, so I resolved to try those tips out next time…
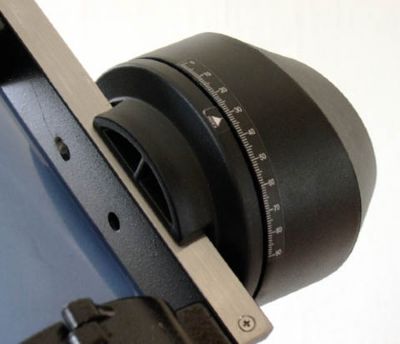
The altitude scale makes it easy to set latitude for tracking.
…Which took place a week or so later! I had spent many evenings scouring the instruction manual, trying to remember all these tips and pointers to maximise my enjoyment of this mount. It’s actually quite important to do so, I think. There are tips dotted about all over the book, not in any one specific place, so it’s worth hanging onto the manual when setting up the first few times. Anyway, once set up, the tracking was better – much better than the second light and almost as good as the first light experience. Strangely, it seemed that tracking accuracy was best when the target was higher in the sky. When viewing Mars, for example, at 230x in the Maksutov, it stayed in the field of view quite well, requiring only moderate tweaking every few minutes. But when viewing M42, much lower in the sky, it required more frequent tweaking to keep it in the eyepiece’s field of view. I find this interesting, and am sure that I may have missed some other obscure little tip that may fix this. It does not put me off too much.
 When not being used astronomically, the SupaTrak has another feature that may interest birders or other types of daytime observer. It is possible to store up to six locations in the mount’s memory by slewing to the position and then pressing the ‘Set’ button on the hand controller. When the locations are set you can then do a tour of them by initialising the ‘Cruise’ function. The mount will slew to each position in turn and stop there for five seconds before moving on. You can interrupt the tour if you want to stop at one particular place. If left uninterrupted, the process will repeat. You also have the option of selecting any one of the locations, hitting ‘Go’, and the mount will slew directly to that place and stop. An interesting feature that holds no interest for me that I know of yet, but I’m sure someone out there will find it useful.
Conclusion
As far as this mount goes, I consider it to be a very useful piece of equipment. It can hold different styles of telescope tubes, including Maksutovs and Newtonians up to 5” aperture, 80mm Apo’s, 100mm short-tube refractors, etc. It’s quite lightweight overall (5kg without tube assembly) and easily assembled, although as with any mount that tracks, the more carefully it is set up the better the result will be. And it’s cheap: Seriously cheap. My package came with a 127mm Maksutov that normally retails by itself for just under £300 – and I got this with the mount and accessories for just under £300! Talk about a no-brainer! Ok, I added a 1.25” dielectric 99% reflective diagonal by Astro-Tech to the shopping list (£45) as I like my diagonals to be as highly reflective as possible, but even so it’s still a cheap set up. I look forward to making a bracket to hold my Coronado PST and using the mount to track the Sun while I observe.
Now bear in mind, if I want ultra-accurate reliable tracking when observing I will use my Vixen GP equatorial mount with dual drives and wooden tripod. It is far and away the better mount for holding a target in the field of view indefinitely. But for quick looks, travelling, or as a grab’n’go package, the SupaTrak serves very well as a sturdy alt-azimuth mount that just happens to have tracking built-in. That’s the way I look at it anyway.
Maksutov Tube Assembly
As for the Maksutov tube assembly, I am enjoying having one back in my collection of telescopes. The five inches of aperture are contained in a very compact portable tube, making it ideal as a medium aperture grab’n’go telescope. The long focal length of 1540mm means the focal ratio is just over 12, making it ideal for planetary and lunar viewing. Medium and long focal length eyepieces provide relatively high magnifications, which means that eye relief is usually comfortable and image scale (the virtual size of the object under scrutiny) quite large. The field of view is flat, meaning that stars at the edge are focused to the same extent as stars in the centre of the view, and there is a very large range of focuser travel, so virtually any 1.25” eyepiece will come to focus. Note that I have not yet used the eyepieces that came with the ‘scope. I have instead used my trusty TeleVue Plossls, Pentax XLs and Meade Ultra-Wide-Angle. I’m a fervent believer that adding good eyepieces to any telescope can only improve the view.
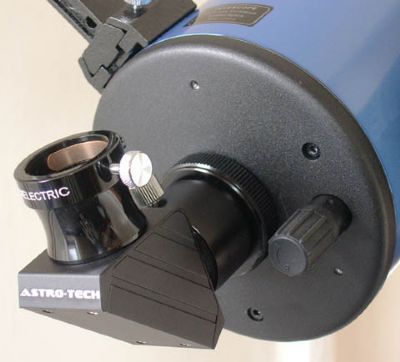
 The focuser will only accept 1.25” diameter eyepieces and there is no official way of converting the visual back to accept 2” diameter accessories. The focus knob is small but quite smooth in operation. Focus is achieved by moving the primary mirror, which can result in some ‘image shift’ when focus direction is changed, but it is really not that bad at all. Views are sharp and bright, and I was able to resolve considerable detail on Mars at 230x. By comparison, the same detail was visible in a 6” f8 Newtonian on the same night, but the Newtonian’s view was slightly brighter. The sky background appeared slightly darker in the Maksutov, which suggested slightly higher contrast, but that may be a function of its slightly smaller aperture. I noted that when used on the SupaTrak mount the focus jiggle that marred my experiences with the ED80 was much better with the 127 Maksutov. The tube is shorter, so I suspect that the length of the telescope tube may have a bearing on that.
The fiddly end.
Build quality is fine, and it feels quite well put together. On close inspection of the interior of the tube, there does appear to be a very small amount of debris (dust and a tiny hair!) inside the tube, but I cannot be sure that it was there when the telescope arrived. It may have found its way inside since I obtained the telescope. How does such debris get inside a sealed optical tube? Answers on a postcard please. It’s not the worst I’ve seen!
The tube does take a while to cool down to ambient temperature. It is required that you allow this to happen or the image in the eyepiece will not settle but will shift and boil due to the tube currents caused by different temperatures inside and outside the tube. I found that an hour was the minimum cool-down period before high power views could be routinely attempted, and the longer it was left to acclimatise the better they got.
It is a very rewarding telescope. Clusters appear very contrasty and sharp, planetary features are sharply defined, and the Moon is literally out of this world! The stark whiteness of the lunar surface explodes out of the eyepiece and the contrasting black shadows of crater depths and rilles appear to be etched or engraved on the view. It is a memorable experience viewing the Moon at high magnification with this telescope. The field of view is slightly limited, as the long focal length means that you’re never going to get a truly wide-field experience with this ‘scope. My Vixen 22mm LVW with an apparent field of view of 68 degrees yielded 70x magnification and a true field of about one-degree, which is perfectly respectable. The telescope split Rigel easily at that magnification, with clear black space between the two components. M42 showed remarkable detail, with a really 3D effect in the clouds of nebulosity. Given that this telescope is replacing a 6” f8 Newtonian in my collection, I do not think that I’ll miss the extra inch of aperture, and the overall quality of the views in this telescope can be described as very pleasing. It really is a joy to use.
Antony McEwan