Observing Mars (2)
The Red Planet (continued)
A common cloud formation is the ‘W’, which is usually seen over Olympus Mons and the three enormous volcanoes perched on a large uplift in the ground known as the Tharsis bulge. The north polar hood may also be glimpsed now that it is currently northern winter. This is a layer of arctic winter cloud or fog that settles over the north polar cap. These atmospheric features are seen best when using a blue or violet filter while observing with a telescope.
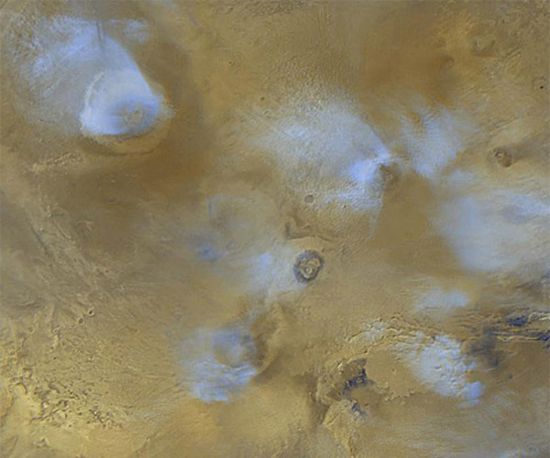
Clouds above the volcanoes- Image credit NASA/JPL-Caltech.
With its axis tilted at 25 degrees, Mars has seasons like the Earth and its polar ice caps grow and retreat depending on the pole facing the Sun. The eccentric orbit of Mars carries the planet 20% further from the Sun during southern winter. This means that the south polar ice cap is larger in the winter than the north polar ice cap ever gets. The southern ice cap shrinks more rapidly in the spring, almost disappearing from view as Mars reaches its closest point to the Sun during southern summer. It is the sublimation of carbon dioxide in the spring and its condensation in the winter that gives rise to the waxing and waning of the Martian polar ice caps. In October, as it was the start of southern summer on Mars, the south polar ice cap became less noticeable all the time. It was detected though, but another bright patch that could be seen (and possibly confused with the ice cap) was the Hellas Basin- a huge impact crater deep in the southern hemisphere.
Powerful winds are driven by the temperature differences in the atmosphere and these may whip up the dusty surface producing local, and sometimes global, dust storms. As dust moves over the surface, features may appear to change slightly, some appearing to increase in size while others may get smaller.
The global dust storms that are so common on Mars are more likely to occur during opposition (as on November 7th 2005) when Mars is closest to the Sun and the southern hemisphere is at its warmest. Then, although Mars is well positioned for observing, a good view is sometimes obscured by dust stirred up by hurricane-force winds as can be seen in the image below.
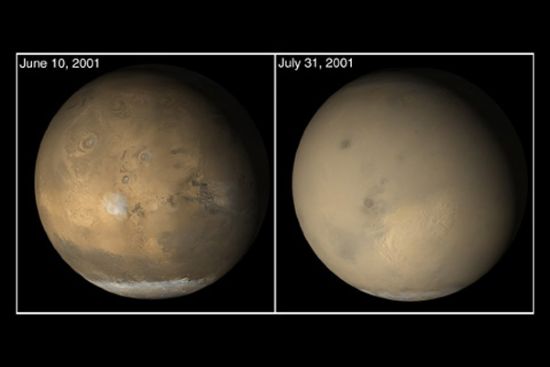
Image credit NASA/JPL Malin Space Science Systems.
Observing Mars
So you can work out which side of Mars you are looking at, Sky and Telescope have an online Javascript programme called 'Mars Profiler'. This is a map of the surface features that you will see on any given date and time and allows identification of the light and dark features. It can be found here on the Sky and Telescope website. Additionally, you can download a small program called 'Mars Previewer II', which will also show you what features are visible, and can be run on your PC even when you are not online. Available here, also from Sky and Telescope.
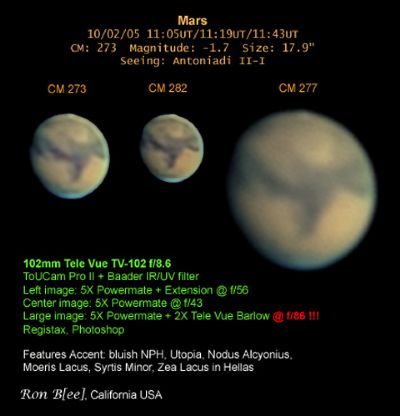 Any size of telescope will show some detail on Mars. The larger the aperture, the more detail will be seen, but this can lead to its own set of problems. Telescopes with large apertures are more susceptible to the effects of ‘bad seeing’; the turbulence produced by air pockets of different temperatures that can move around in the atmosphere, causing images at the eyepiece to swirl or jump about. Telescopes of 8” aperture or smaller tend to be affected less as they have a lower chance of actually looking through one of these pockets.
If you use a reflector telescope make sure that it is collimated. This is important when viewing Mars because the small size of the planets disc requires using high magnifications (around 100x to 200x or more sometimes) to see details and this sort of magnification easily shows up miscollimation. Refractors or catadioptric telescopes are less prone to miscollimation but it is still worth checking or you could be seeing less clearly than possible.
When observing, it is vital to let your telescope cool down to ambient 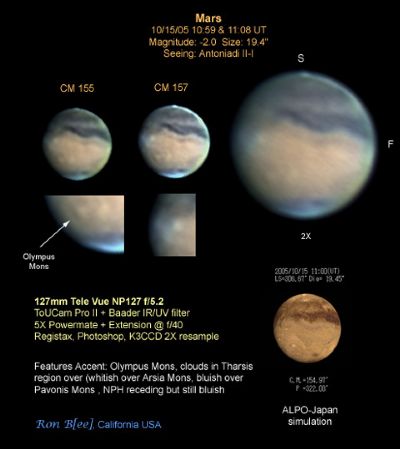 temperature. Otherwise, when using the high magnifications required, the image will appear to 'boil' as warm air inside the telescope distorts the image. Coloured filters are useful when viewing Mars as they can help to reveal different types of feature. As mentioned above, red or orange filters can help to show the dark land areas, while blue or violet can help show up clouds or the ice caps. Experiment with them, but take the time to let your eye adjust to the view, as filters do not instantly reveal things as if by magic. Other useful filters are polarising or contrast booster types. These can help to reduce the glare at high power and sharpen up the image a little. Also, be sure to wait until Mars has risen high above the horizon so it is not viewed through thick layers of atmosphere, which will otherwise also cause the image to boil and introduce false colours to the planets limb.
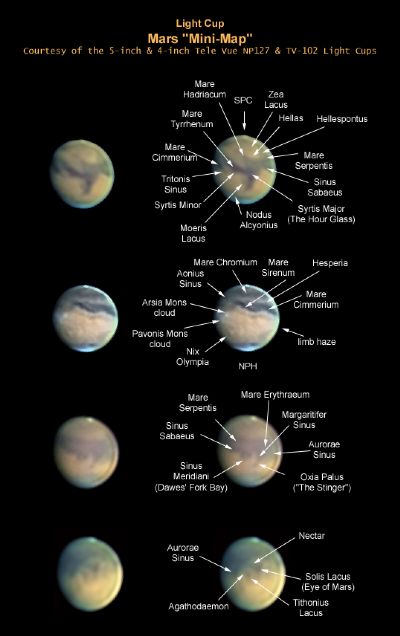 You could try sketching or imaging the various features that can be seen, or you may prefer to see the different features on Mars as it rotates. The images to the left show what can be achieved when using good equipment to capture images of Mars. When observing Mars at the same time each night you will find that it will have turned 10° less. Thirty-seven minutes later it will be oriented exactly as it was the night before and every thirty-six days you will be back at your starting point.
Reading through this it may appear that Mars can be a challenging object to view. Actually, it just requires some patience and preparation. Quick glances will probably reveal little but go out prepared and you will be rewarded with some memorable views of the red planet. At least one positive point is that light pollution has little or no impact on planetary observing, so even urban astronomers can enjoy observing Mars. Click on the image to left to reveal a larger picture of the features that can be seen with a 4" or 5" refractor on a night of good seeing.
Don't forget to dress warmly and have fun!